The quickest path to a stable two-PC stream
- Choose the split for a reason: use a second PC when encoding, overlays, or recording are hurting game performance.
- Capture card first, NDI second: a card is simpler and more predictable; NDI is cleaner on cables but depends on the network.
- OBS 30+ is the safe baseline for current NDI workflows, with NDI Runtime 6+ on the source machine.
- Keep audio on one master route so you do not end up with echo, delay, or doubled desktop sound.
- Use passthrough that matches your monitor if you care about high refresh gaming.
- For most UK builds, reusing a spare desktop plus a midrange capture card is usually the best value.
Why two PCs still make sense for live streaming
I only recommend splitting the workload when there is a real bottleneck to remove. If your gaming PC already runs smoothly, encodes cleanly, and keeps frame pacing steady, a second machine may add more complexity than value. But when the game is heavy, the scene is busy, or you record locally while streaming, a dedicated stream PC can protect the part that matters most to viewers: stable video and clean audio.
The big advantage is separation. The gaming machine can focus on rendering the game, while the stream machine handles the encoder, scene composition, camera feeds, alerts, chat, and the actual upload. That separation also makes crashes less painful. If the game freezes, the broadcast can stay live. If OBS needs a restart, the game does not have to close with it.
There is a limit, though. In 2026, modern GPUs with strong hardware encoders have made single-PC streaming much better than it used to be. That means the second computer is no longer the default answer for everyone. I would choose it when you need isolation, extra headroom, or a cleaner production workflow, not just because it sounds more professional. That distinction matters, because it shapes the hardware choice that comes next.
Which connection path fits your build
For a two-PC streaming rig, the first decision is not the software. It is how the video and audio will move from the gaming machine to the stream machine. The two most useful paths are a capture card or NDI over the network. Both work, but they solve different problems.
| Path | What it needs | Strengths | Trade-offs | Typical UK spend |
|---|---|---|---|---|
| Capture card | HDMI from the gaming PC, plus a USB or PCIe capture device on the stream PC | Predictable, easy to debug, low dependence on the network | Extra hardware, more cables, passthrough limits if you game at high refresh rates | About GBP 120-350 for the card, more for higher-end models |
| NDI | OBS on both machines, DistroAV NDI plugin, NDI Runtime, wired Ethernet | Fewer cables, flexible layouts, no capture box to buy | More software setup, more sensitive to network quality, less forgiving when something is misconfigured | Can be very low if you already have a strong wired network |
NDI is attractive when you want a lighter hardware footprint. NDI's current OBS guide uses OBS Studio 30.0 or later, the DistroAV plugin, and NDI Runtime 6 or later as the starting point. That makes it a serious option, but not a casual one. If you install it, remove older OBS-NDI versions first, install the plugin after OBS, and restart both machines when you are done. It is a neat workflow when it is healthy, but I would not build my first live rig around it if the network is already a weak link.
For most people, the capture card path is still the safest first buy. It is less elegant, but it is easier to trust. If you know you will also run a camera, overlay alerts, and local recordings, the extra reliability is usually worth more than the cleaner cable layout of NDI. Once that choice is made, the physical wiring becomes straightforward.

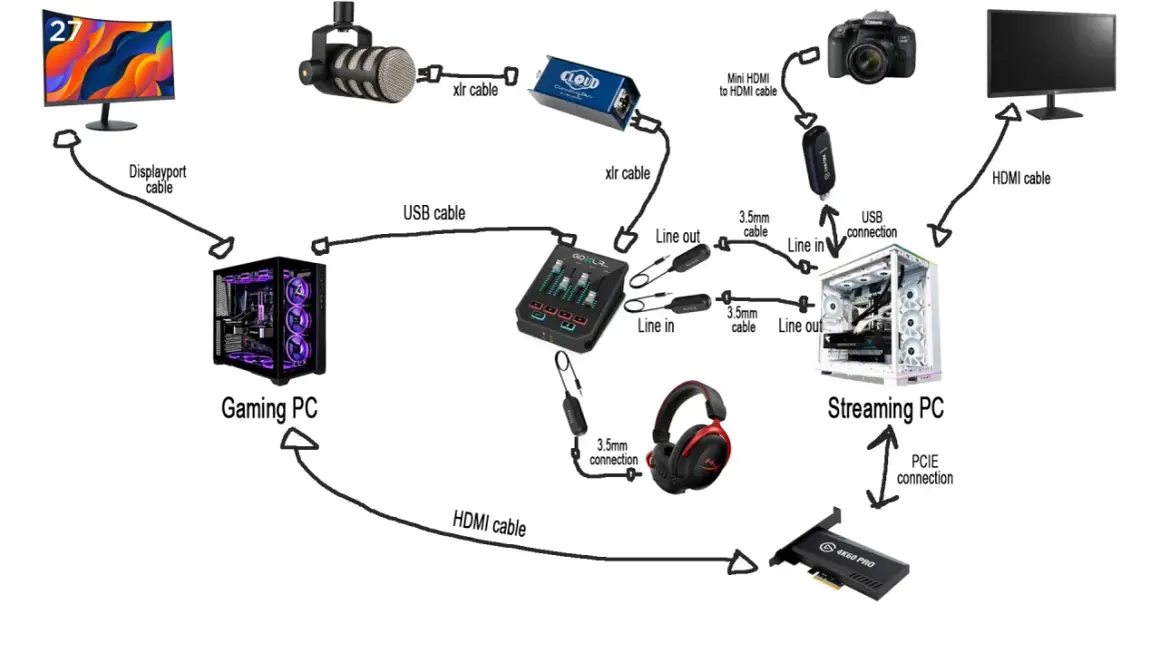
How to wire the gaming PC and the streaming PC
I prefer to decide the signal path before I open OBS. When the cables are correct, the software part becomes almost boring. When they are wrong, you end up troubleshooting a screen that is blank for three different reasons at once.
- If you are using a capture card, run HDMI from the gaming PC's GPU output into the card's input.
- If the card supports passthrough, run another HDMI cable from the card to your gaming monitor. Passthrough simply means the card forwards the video to the display while also sending a copy to the stream PC.
- Match the card to the monitor you actually use. If your panel is 1440p at a high refresh rate, make sure the card and passthrough path support that signal cleanly, otherwise the capture chain becomes the bottleneck.
- If your monitor only has DisplayPort and the card only accepts HDMI, use the GPU's HDMI output or a proper active adapter. A cheap adapter that cuts your refresh options is not a win.
- If you are using NDI instead, connect both PCs to the same wired network. I would not trust Wi-Fi for the source feed if the stream matters.
One practical habit helps here: label the cables before you power everything up. I have seen more wasted time caused by "which HDMI goes where" than by almost any other problem in a two-PC build. A few minutes with tape and a marker can save an hour of guesswork later.
When the cabling is right, the stream machine can take the video without dragging the gaming PC down. The next step is making OBS reflect that clean signal instead of fighting it.
Set up OBS on the streaming machine
The streaming PC should be the place where the production actually happens. It receives the video, adds scenes and overlays, mixes audio, and sends the final output to the platform. That also means it should be set up deliberately, not treated like a spare desktop with software sprinkled on top.
- Install OBS Studio 30.0 or later on the streaming PC. If you are using NDI, install it on the source PC as well.
- Add your source. For a capture card, use Video Capture Device. For NDI, add the NDI source created by DistroAV.
- Set your base canvas to the source resolution. The base canvas is the working size of the scene. Set the output resolution to the size you actually want to stream.
- For most live channels, start with 1080p60. If your upload speed, platform settings, and bitrate headroom allow it, 1440p60 can look cleaner, but only when the rest of the chain is already stable.
- Pick a hardware encoder on the stream PC if available. The stream machine should be doing the compression, not the game machine.
- Run a local test recording for five minutes before you go live. I want to see motion, a scene change, microphone speech, and at least one browser or alert overlay in that test.
Do not overbuild the scene list on day one. Start with a gameplay scene, a break scene, and a starting scene. Once those work cleanly, you can add lower-thirds, animated alerts, and more elaborate branding. Too many moving parts too early usually makes the system feel heavier than it needs to be.
If OBS sees the feed, encodes it, and records it correctly, the remaining weak point is usually audio. That is where many otherwise solid builds become annoying.
Fix audio before it breaks the stream
Audio is the part that most often turns a good rig into a frustrating one. You can tolerate a tiny delay in a camera feed. You cannot tolerate an echo, doubled desktop sound, or a mic that arrives half a second late. I always treat audio as a routing problem first and a quality problem second.
The cleanest rule is simple: one source, one master route. If the microphone is on the stream PC, keep it there. If the game audio is being sent over HDMI or NDI, do not also send that same desktop audio through a second path unless you have a very specific reason.
Elgato's current dual-PC audio guide uses the same basic idea. It sends a clean stream mix over HDMI to the streaming machine, which is exactly the kind of concept you want to preserve even if you use another brand of hardware. The naming may change, but the principle does not.
- Put the microphone on the stream PC whenever possible.
- Send game audio through the capture path, not through a second mystery cable.
- Use headphones instead of speakers if you want to avoid room echo.
- Check whether chat audio from Discord or similar apps should stay on the gaming PC or be excluded from the stream mix.
- If lip sync looks off, add a small audio offset in OBS and retest with a short clip before changing anything else.
When I am debugging audio, I mute one path at a time until I can hear exactly where the duplication starts. That is much faster than changing five settings and hoping the result gets better by accident. Once the audio is clean, the remaining issues are usually easy to spot.
The mistakes that cause lag, black screens, and echo
Most two-PC problems look complicated at first, but they usually come from a small set of mistakes. The useful part is that those mistakes are repeatable, which means you can build a check list instead of endlessly guessing.
| Symptom | Likely cause | What I would check first |
|---|---|---|
| Black screen in OBS | Wrong input selected, unsupported refresh rate, bad HDMI path, or a capture card not seeing the GPU output | Confirm the gaming PC is actually sending video to the card, then test at a lower resolution and standard 60 Hz |
| Stutter on the stream PC | Network congestion, too many sources, or the encoder being pushed too hard | Use a wired connection, reduce source count, and simplify the scene before touching bitrate |
| No game audio | Desktop audio is routed to the wrong device or the capture device is not receiving HDMI audio | Check the gaming PC's audio output and verify the capture card is carrying audio into OBS |
| Echo or doubled voice | The mic is being monitored twice, or speakers are feeding the room back into the mic | Use headphones and keep one monitoring path only |
| Frame drops on the stream PC | Encoder preset too aggressive, source resolution too high, or too many browser sources and animations | Lower the output settings first, then simplify the scene |
If you change one thing and three problems appear, revert that change first. That sounds obvious, but people rarely do it. They keep stacking fixes on top of a broken assumption, and the result is a stream that feels random even when it is not.
My rule is to stabilise the feed before I optimise the polish. A clean 1080p60 broadcast with no echo beats a flashy scene that falls apart every twenty minutes. Once the system is reliable, you can make it prettier. That leads straight into the question most creators actually care about: what should this cost in the UK?
What I would buy first for a sensible UK build
In the UK, the smartest budget depends on whether you already own a spare desktop. If you do, the build can stay relatively modest. If you are buying every part from scratch, the cost climbs fast and the second PC has to earn its place.
| Build route | Approximate spend | Best for |
|---|---|---|
| Spare desktop plus entry-to-mid capture card | GBP 120-350 | Stable 1080p60 streaming, simple scenes, minimal risk |
| Spare desktop plus NDI-first workflow | GBP 0-80 | Creators who already have a good wired network and want fewer physical devices |
| Dedicated new stream PC | GBP 500-1,200+ | Long-term reliability, heavier scene work, recording plus streaming at the same time |
If the gaming PC is the only machine you own, I would not rush to buy a new stream tower just because the idea sounds advanced. In 2026, a better microphone, better lighting, and a more efficient single-PC encoder path often deliver a bigger quality jump for less money. The second computer makes sense when you have a clear technical reason for it, not as a badge of seriousness.
My practical order of operations is simple: reuse what you already have, add the smallest reliable capture path that fits your refresh rate, and only move to a larger build if the stream still needs more headroom after that. That keeps the project useful instead of turning it into an expensive detour.
How to keep the rig easy to live with after the first stream
The best two-PC build is the one you can restart without opening a diagram every time. A little discipline early on makes that possible. Save your OBS scene collection after the first clean test, keep one backup copy, and write down the exact audio route while it is fresh in your head.
- Label the HDMI, USB, and audio cables so you can trace them in seconds.
- Keep one spare HDMI cable and one spare USB cable in the desk drawer.
- Export your OBS profile and scene collection after each major change.
- Test again after driver updates, plugin updates, or Windows updates.
- Document whether the mic, game audio, and chat audio live on the gaming PC or the stream PC.
What matters most is consistency. If you can power the machines on, see the video, hear the right audio, and stream without touching settings every time, the setup is doing its job. That is the standard I would aim for with any two-computer broadcast rig, and it is the difference between a clever build and a reliable one.