Adding files to a collaborative Google Drive space is easy once you know whether you are dealing with a normal shared folder or a shared drive. The difference matters, because the upload method is similar, but the permission rules, ownership, and storage behaviour are not the same. In this guide, I’ll walk through the fastest ways to upload from a computer or phone, explain the access levels you need, and show the mistakes that usually stop collaboration dead.
The quickest path depends on access, folder type, and where the file starts
- Shared folders in My Drive usually need Editor access before you can add files.
- Shared drives use different roles, and adding files typically requires Contributor or higher in the web version.
- Drag and drop is the fastest desktop method, but New > File upload is safer when you want to be precise.
- Mobile uploads work well for documents, PDFs, images, and other everyday files.
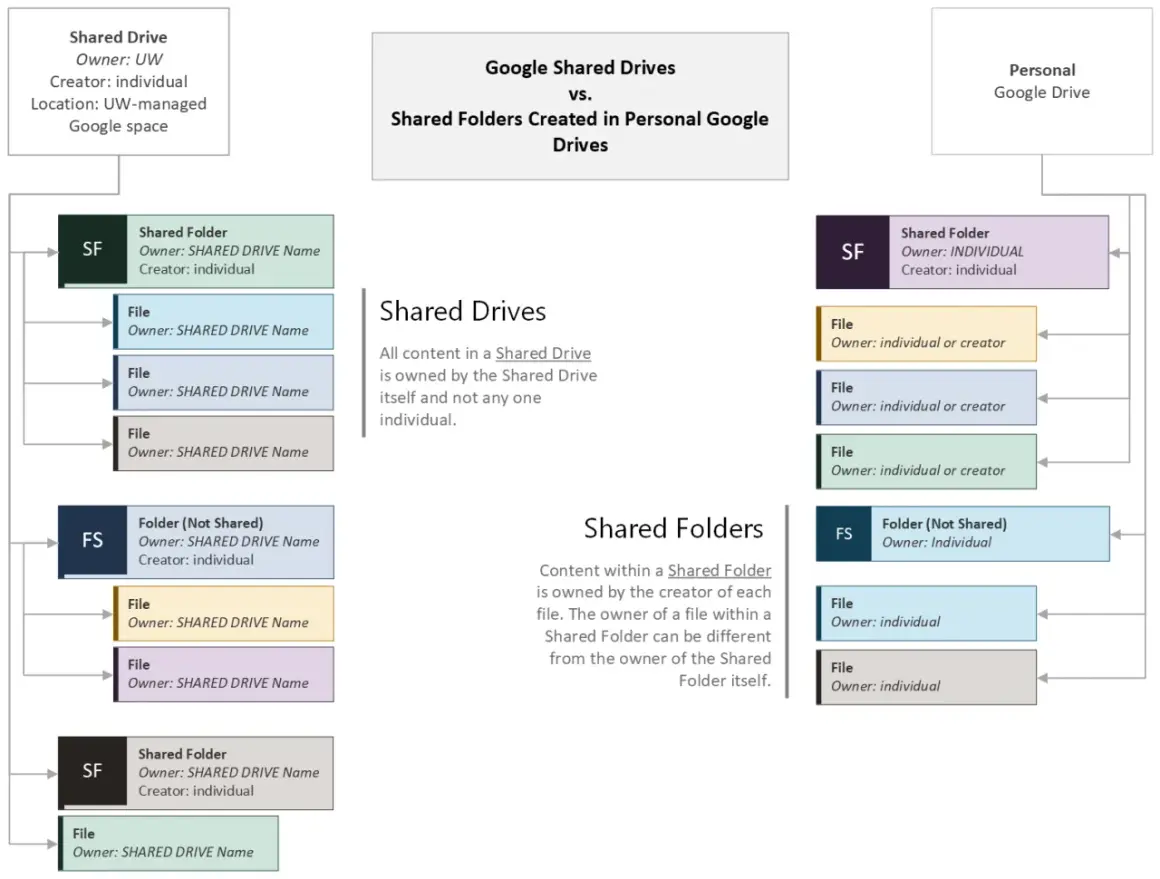
- Ownership matters: in a shared folder, the uploader usually owns the new file, while a shared drive keeps team ownership.
Check the folder type before you upload anything
I start here because most upload problems are really permission problems hiding behind a familiar folder icon. A folder shared from someone’s My Drive behaves differently from a shared drive, and a shortcut in Shared with me is only a pointer to the real location.
| Type | Who can add files | Who owns new uploads | Best use |
|---|---|---|---|
| Shared folder in My Drive | Usually Editors | The uploader | Small teams, client reviews, one-off collaboration |
| Shared drive | Contributor or higher in the web interface; some desktop setups require Content manager or Manager | The team | Ongoing projects, departments, shared archives |
| Shortcut in Shared with me | Only if you already have rights in the original folder | Depends on the original item | Quick access to something someone else shared with you |
If you only see the folder under Shared with me, create a shortcut to make it easier to find, but do not treat the shortcut itself as upload permission. Once you know which structure you are in, the actual upload steps are straightforward. That distinction is what keeps the rest of the process clean.
Upload from a computer without breaking the folder structure
For most teams, this is the method I would use first. Open the folder, then either drop the file into it or choose upload from the menu. In a browser, Drive handles the transfer directly; with Drive for desktop, you are effectively placing the file into a synced location that then pushes to the cloud.In the browser
- Open Google Drive in a browser and go to the shared folder or shared drive.
- Confirm that you are in the real destination, not just a shortcut.
- Drag the file into the window, or click New and choose File upload or Folder upload.
- Wait for the upload to finish before closing the tab, especially if the file is large.
- Open the file once after upload to confirm it landed in the right place and still opens correctly.
Read Also: Google Drive Links - Master Sharing & Avoid Errors
With Drive for desktop
If you use Drive for desktop, drag the document into the Google Drive folder on your computer instead. The app then syncs it back to Drive, which is useful when you are dealing with repeated uploads or a full production folder. I prefer this approach for teams moving video briefs, scripts, and review notes in batches, because it is faster than opening the web interface every time.
One practical detail matters here: if the shared drive is set up with limited desktop permissions, Contributor access may behave as read-only in the app. When that happens, the browser version is usually the cleaner option, or the folder needs a higher role assigned. Once the desktop route is clear, mobile uploads are usually the next easiest option.
Add files from the Google Drive mobile app
The mobile app is enough for most everyday uploads, such as a contract, a PDF proof, a JPG from set, or a short spreadsheet. The exact buttons vary a little between Android and iPhone, but the flow is consistent.
- Open the Google Drive app and sign in to the correct account.
- Open the shared folder or shared drive you want to use.
- Tap the plus button or New, then choose Upload.
- Select the files from your phone, tablet, or files app.
- Wait for the upload to complete, then check that the file appears in the correct folder.
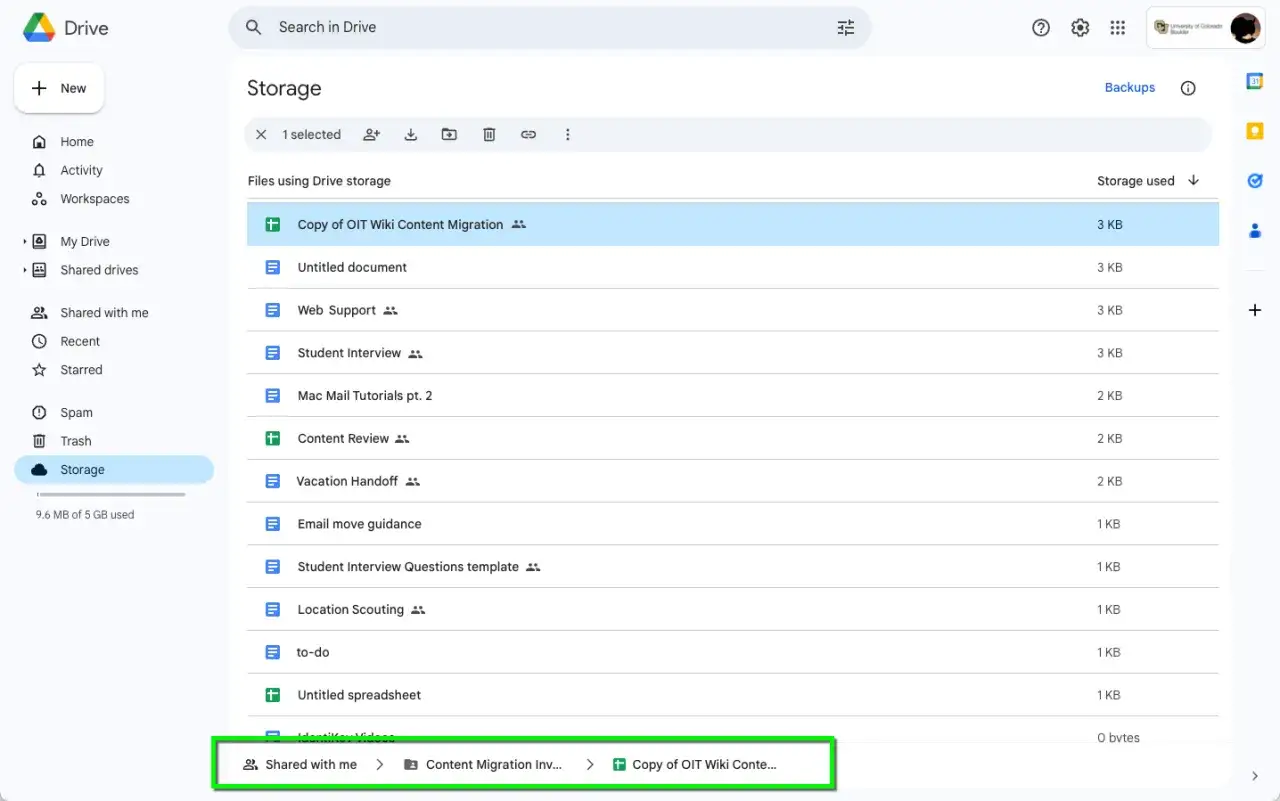
If the document is sitting in email, a messaging app, or your phone’s file picker, use the share sheet to send it to Drive first and then move it into the shared folder if needed. That extra step is annoying, but it is often the fastest route when you are away from your laptop. It also avoids the common mistake of thinking a file has been filed correctly when it has only been uploaded into your personal area.
Fix the problems that stop uploads
When an upload fails, the cause is usually simple, and it is rarely the document itself. I would check permissions first, then location, then storage. That order saves time because it follows the way Google Drive actually fails in day-to-day use.
| Problem | What it usually means | What to do |
|---|---|---|
| You can view the folder but not add files | You probably have Viewer or Commenter access | Ask for Editor access in a shared folder, or Contributor or higher in a shared drive |
| Upload works in the browser but not in Drive for desktop | Your desktop role may be too limited for that app | Try the browser version, or ask for Content manager or Manager access if your workspace uses stricter desktop rules |
| The file appears in the wrong place | You uploaded to a shortcut or to My Drive first | Open the real destination folder and move the file there |
| Your storage fills up after you upload | In a shared folder, the uploader usually owns the file | Free up personal storage or use a shared drive for team-owned files |
Keep the folder organised once the project is live
Uploading is only half the job. If the folder becomes a dumping ground, collaboration slows down fast, and nobody wants to spend ten minutes searching for the latest brief or export. I recommend setting a light structure before the first batch of files lands.
- Use clear names with dates or version numbers, such as brief-v03 or client-notes-14-june.
- Separate working files, final exports, and reference material into different subfolders.
- Use a shared drive when the folder belongs to a team, client, campaign, or recurring production cycle.
- Give one person Manager or Content manager rights so permission changes do not drift over time.
- For video work, create subfolders for scripts, approvals, exports, and source assets so the folder mirrors the workflow.
That structure takes a few minutes to set up, but it saves far more time later when the folder starts filling up. If the team uploads regularly, the safest pattern is simple: choose the right Drive location, give the right access level, and keep the folder structure predictable from the start.