VLC can do more than play files. It can also save a clip from playback, capture a live stream, grab a desktop or camera feed, and pull out audio when you do not need a full editing suite. In practice, the trick is not learning a hidden feature so much as choosing the right capture path and keeping the settings simple enough that the file actually survives the recording.
The fastest way to use VLC as a recorder is to match the source to the right capture path
- For a playing file or stream, VLC can save what is already playing, which is useful for quick clips and stream archiving.
- For screen or webcam capture, the capture device workflow is the more reliable route, especially when you need a live source.
- For audio-only work, keep the chain short and avoid heavy transcoding unless you truly need it.
- For long or complex jobs, VLC is convenient but not the most robust recorder, so test first and keep expectations realistic.
- As of 2026, VideoLAN’s desktop line is still centred on the 3.0.23 branch, and the basic capture logic remains familiar.
- The biggest failures usually come from the wrong destination, the wrong source, or trying to record at settings the machine cannot sustain.
What VLC can realistically record
I usually separate VLC capture into four jobs: saving a playing video, archiving a live stream, capturing a screen or camera, and recording audio. That distinction matters because each one behaves differently, and the same button does not always give the same result. A quick clip from a movie is easy. A live desktop capture with audio is a different problem entirely.
For UK readers, the menus are the same on the major desktop platforms, but the device names and save locations can differ slightly between Windows, macOS, and Linux. That is why I prefer to think in terms of source first, output second. If I know where the media comes from, the rest of the workflow is straightforward.
| Source | Best VLC path | What it is good for | Main limit |
|---|---|---|---|
| Local video or network playback | Play it, then record or save the stream | Short clips, simple archiving, fast reuse | Not ideal for frame-accurate editing |
| Live stream | Open network stream, then convert or save | Saving broadcasts, online talks, live sessions | Codec choice and stream stability matter a lot |
| Desktop or webcam | Open capture device | Tutorials, demos, face cam, presentations | Audio sync and frame rate can drift if the machine is busy |
| Audio source | Capture device or audio-friendly output profile | Voice notes, radio, rough podcast capture | Less polished than dedicated audio software |
The short version is this: VLC is best when you want a lightweight recorder, not a production pipeline. Once that is clear, the practical steps become easier to follow.
How I would record a playing video or live stream
For a file that is already playing, I treat VLC like a quick capture tool. Open the media, start playback, and then use the record control if your build shows it. That is useful when you want a short excerpt or when you need to save part of a stream without opening a separate recorder.
For a live stream, I prefer the stream-saving route over relying on the red Record button alone. It gives you more control over the destination and usually behaves better when the source is remote.
- Open the file or network stream in VLC.
- Play it long enough to confirm the source is stable.
- If you are clipping playback, start recording at the point you want to keep.
- If you are archiving a stream, choose the save or convert path and pick a destination folder.
- Use a format that your editor or player will open without extra work.
- Stop the capture after a short test run and check the file before committing to a longer recording.
What matters here is discipline. I would rather lose 20 seconds in a test than discover 20 minutes later that the output folder was wrong or the file is unusable. That leads naturally to the source that people often underestimate: screen and camera capture.
How I would capture a screen or webcam in VLC
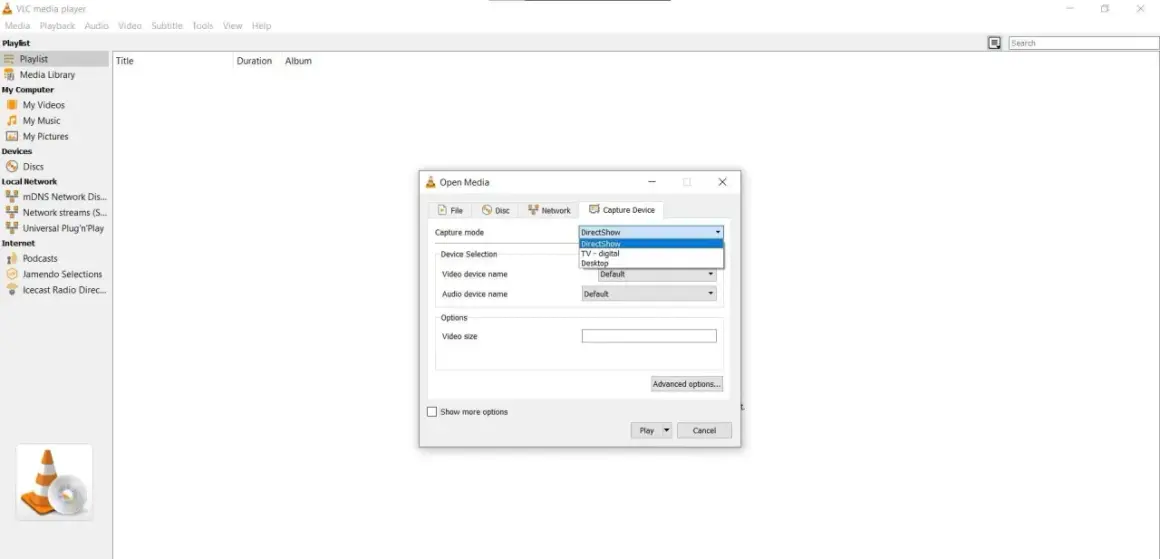
Screen capture is where VLC starts to feel more fragile. It can work well, but only if the source, frame rate, and audio path are all behaving. On Windows, the capture mode often routes through DirectShow-style device selection. On macOS and Linux, the device labels are different, but the idea is the same: tell VLC what it should see, then decide whether to play it live or save it.
For a webcam, I would choose the camera directly and keep the output settings moderate. For a desktop capture, I would avoid pushing a high frame rate unless the content actually needs it. A 25 or 30 fps capture is usually enough for presentations, walkthroughs, and app demos. If you are recording motion-heavy content, you can go higher, but only if your CPU and disk can keep up.
- Choose the desktop or camera as the source.
- Test whether the preview updates smoothly before you record for real.
- Keep the resolution and frame rate modest unless the source needs more.
- Check audio separately, because video can look fine while sound drifts or drops out.
- Do a short sample first, then inspect both picture and sound.
That last point is the one I repeat most often. Screen capture failures are rarely dramatic at the start. They usually show up as drift, lag, or a file that only looks correct until you play it back a second time. Audio-only capture has its own version of that problem.
Audio capture is simple until sync and level issues show up
Recording audio in VLC is straightforward when the source is clean. A microphone, line-in feed, radio stream, or spoken-word session can all be captured without much effort. The trouble starts when levels are too hot, the input source is wrong, or the machine is already busy handling video at the same time.
If I only need audio, I keep the workflow as lean as possible. That means using an audio-friendly output, checking that the right input device is selected, and watching for clipping. Once audio clips, you cannot fix it later by turning the volume down. You only make a distorted file quieter.
My practical rule: if the source is speech, I would rather record a cleaner signal at a slightly lower level than chase the loudest possible file. That is especially true for voiceovers, interviews, and podcast rough cuts.
- Use the correct input device, not just the default one.
- Keep headroom so peaks do not distort.
- Choose an output that matches the end use, not just the quickest option.
- Test with 10 to 20 seconds of real speech or real programme audio.
- If the file is meant for editing, keep the capture clean and avoid unnecessary processing.
Once the source is stable, the output settings decide whether the file is useful or just technically complete. That is where a lot of VLC captures go wrong.
The settings that decide whether the file is usable
I always start with compatibility, not perfection. The best settings are the ones that create a file your editor, player, or upload tool can open immediately. For most video jobs, that means a common container and a sensible frame rate. For audio-only jobs, it means a format that stays clean and lightweight.
| Setting | My default choice | Why it matters |
|---|---|---|
| Container | MP4 or MKV for video, WAV or MP3 for audio | Fewer playback problems and easier handoff to other tools |
| Frame rate | 25 to 30 fps for most desktop captures | Stable enough for tutorials without overloading the machine |
| Quality | Moderate first, higher only if needed | Lower settings reduce dropped frames and wasted space |
| Destination | A simple local folder with plenty of free disk space | Prevents save errors and makes the file easy to find |
| Transcoding | Only when the output needs a different format | Transcoding adds load and increases the chance of sync issues |
The main trade-off is always the same: higher quality versus lower risk. If a capture is important, I keep the settings conservative and only raise them after a successful test. That brings me to the situations where VLC is not the right answer at all.
When VLC is the wrong tool
I like VLC, but I do not treat it as a universal recorder. If the job needs multi-track editing, tight post-production work, noise reduction, overlays, or reliable long-form screen capture, I move to a dedicated tool. VLC is convenient. It is not a full production environment.
There are also practical boundaries. If the source is heavily protected, if the capture needs broadcast-style consistency, or if the system is already strained, VLC becomes a risky choice. It may still work, but the margin for error gets thinner. In those situations, a specialised recorder or a proper editor saves time in the end.
- Use VLC for quick utility captures, not for polished productions.
- Switch tools when you need heavy editing or multi-source composition.
- Do not expect VLC to solve poor source quality or bad audio routing.
- Test protected or fragile streams on a short segment before you rely on them.
That is why my default recommendation is not to ask whether VLC can record in the abstract. I ask whether it can record this source well enough for the job. For most everyday captures, the answer is yes if you keep the workflow simple.
The capture routine I would use first on any new setup
When I start fresh, I use the same routine every time. First, I do a short test capture. Then I check the file in another player. If both the picture and sound are fine, I continue. If not, I change one variable at a time instead of guessing. That is the fastest way to avoid wasting a long recording session.
- Pick one source and one destination folder.
- Use the simplest output format that fits the job.
- Record 20 seconds before you commit to a longer run.
- Verify audio immediately, not after the whole session is over.
- Keep transcoding off unless you have a reason to enable it.
If you want VLC to behave like a dependable recorder, keep the workflow boring. Boring is good here: one source, one output, one quick test, then the real capture. That approach gives you the cleanest result with the least friction.