The fastest Mac workflow is to match the tool to the edit
- Use GarageBand or Audacity for waveform edits such as trimming, splitting, fading, and light cleanup.
- Use the Music app for track info, artwork, and file naming decisions, not for audio surgery.
- Keep an untouched master copy, because MP3 is a lossy format and repeated exports can soften the sound.
- Export once, at a sensible bitrate, rather than saving the same MP3 over and over.
- If you only need a quick trim, a lighter editor is usually faster than a full production app.
What actually changes when you edit an MP3
Before you open any software, it helps to separate the file into two layers. The first layer is the audio itself, which is what you hear in the waveform. The second layer is metadata, which includes the title, artist, album, genre, artwork, and sometimes comments. If you edit the wrong layer, the file can look right in one app and wrong in another.
MP3 is a compressed, lossy format. That means the file has already thrown away some audio data to stay small. A single careful export is usually fine, but repeated edits and re-exports can introduce extra loss, especially if you keep opening the same MP3 and saving it again at a lower bitrate. My rule is simple: keep the original untouched, edit a copy, and export only when the cut is final.
- Waveform edits change what you hear, such as trimming an intro or removing a mistake.
- Metadata edits change how the file is labelled in players and libraries.
- Project files keep edits reversible until you are ready to export.
Once that distinction is clear, choosing the right app on Mac becomes much easier, because each tool is good at a different layer.
Choose the right app for the kind of edit you need
I would not use the same app for every job. For light, everyday edits, Apple’s GarageBand is often enough. For more detailed waveform work, Audacity is the better fit, especially because it is free and built for editing rather than composition. For metadata, the Music app is the more sensible place to work. That separation saves time and prevents accidental file damage.
| Tool | Best for | Strengths | Limits | Cost |
|---|---|---|---|---|
| GarageBand | Trim, split, simple cleanup, short voice or music edits | Easy timeline editing, non-destructive workflow, straightforward export | Less precise than a dedicated audio editor for surgical repairs | Included with many Macs |
| Audacity | Detailed waveform edits, noise reduction, batch-style tasks | Free, flexible, strong for editing and export | Interface can feel less polished if you only need a quick trim | Free |
| Music | Track info, artwork, organisation, file naming decisions | Good for metadata and library management | Not a waveform editor | Included with macOS |
If the edit is small, GarageBand is usually the fastest compromise. If the file needs real repair work, Audacity gives you more control. The important thing is not the brand name, it is using the right layer for the job.
Trim, split, and clean the waveform without overediting
For most people, the real task is not “editing an MP3” in the abstract. It is trimming a spoken intro, cutting out a mistake, or cleaning a noisy recording so it sounds acceptable on headphones and speakers. That work is easiest when you make the smallest possible change and leave the rest of the file alone.
- Duplicate the file first, then open the copy.
- Zoom in around the edit point so you can see where the audio actually starts and ends.
- Trim silence at the beginning or end rather than cutting too close to speech.
- Split longer recordings into sections if you need separate clips or chapters.
- Add short fades at joins, because a hard cut can create an audible click.
- Use noise reduction sparingly, only when the noise is steady and obvious.
I see one mistake repeatedly: people try to make a recording sound “studio perfect” and end up flattening it. A voice track that has been over-processed often sounds thin, metallic, or artificial. A small reduction in background hiss is useful; aggressive cleanup usually is not. If the source is already decent, a clean trim and a careful fade are often enough.
After the waveform is clean, the next question is how to export it without undoing the work you just did.
Export settings that matter more than people think
Export is where a lot of otherwise decent edits go wrong. If you save the result at a low bitrate, or keep re-exporting the same compressed file, you lose quality that no amount of later editing can restore. The right setting depends on the role of the file, not just its size.
| Use case | Recommended format | Practical setting | Why it works |
|---|---|---|---|
| Voice notes and short spoken clips | MP3 | 96 to 128 kbps, mono or stereo as needed | Keeps the file small while remaining clear for speech |
| Podcasts or mixed speech and music | MP3 | 160 to 192 kbps | Better balance between file size and audible quality |
| Music or anything you expect to reuse later | MP3 or AAC/M4A | 256 to 320 kbps if MP3 is required, AAC/M4A if compatibility allows | Protects more of the original detail |
| Archive or master copy | WAV or AIFF | Uncompressed | Best if you plan to edit the file again later |
For delivery, MP3 is still the safest universal choice. For internal editing, AAC or M4A can be a smarter working format if you do not need MP3 specifically, because you can often get similar perceived quality at a smaller size. Either way, the main principle stays the same: export once from the cleanest source you have.
Audio quality is only part of the job, though. A file can sound right and still be badly labelled, which is where metadata comes in.
Edit metadata and filenames separately
Metadata editing is easy to overlook, but it matters a lot if the file will live in a library, be shared with collaborators, or end up in a player that reads tags rather than filenames. I always separate the two problems in my head. The waveform is the sound. The tags are the identity.
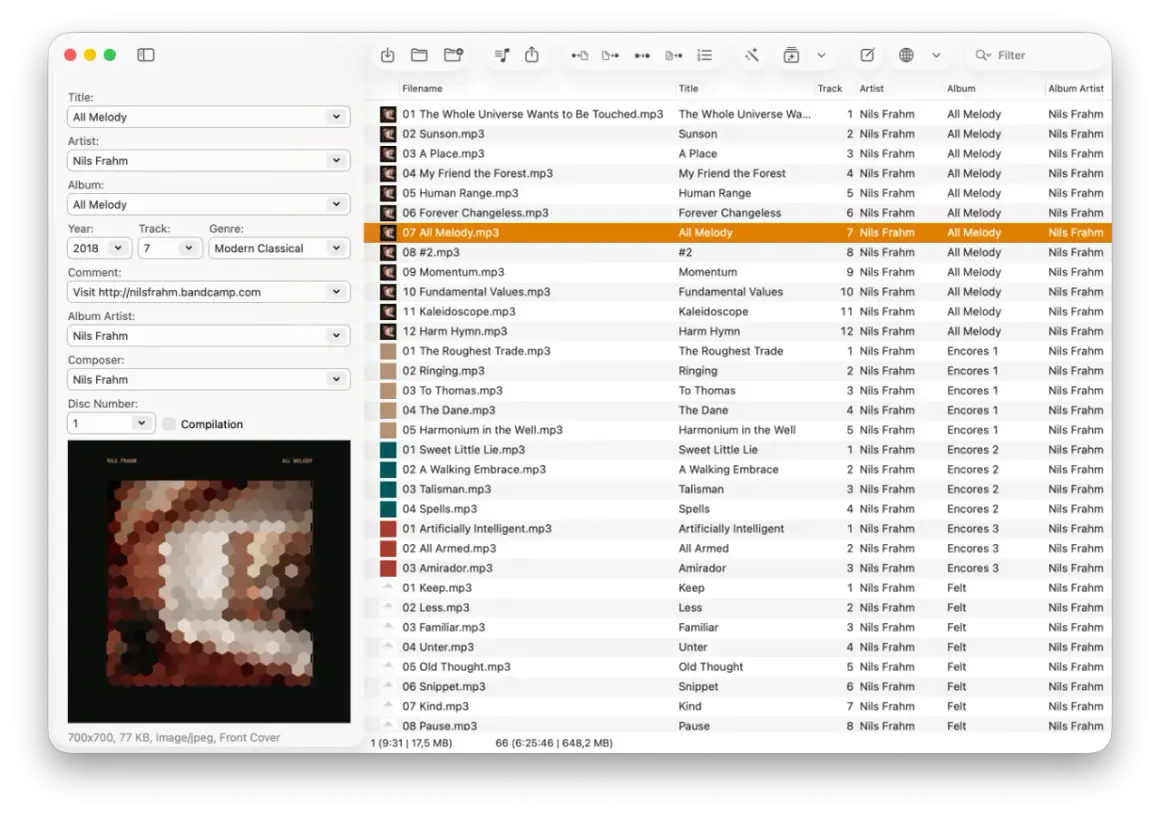
On Mac, the Music app is useful for changing song information such as title, artist, album, genre, and artwork. Apple also notes that changing the info in Music does not have to change the file on disk, which is exactly the behaviour I want when I am organising a library. If you prefer your own folder structure, check the library settings before letting the app rename anything automatically.
- Title and artist help the file display correctly in players and smart playlists.
- Album and track number matter for podcasts, albums, and multi-part recordings.
- Artwork is worth adding if the file will be shared or archived.
- Comments can store episode notes, version details, or usage hints.
This is one of those places where a small amount of discipline pays off later. A well-tagged MP3 is easier to find, easier to reuse, and far less annoying to hand off to someone else.
Mistakes that create a bad export
Most bad results come from a short list of avoidable mistakes. None of them are complicated, which is why they show up so often.
- Editing the only copy, then realising you need the original later.
- Re-exporting a low-bitrate MP3, which compounds the compression loss.
- Cutting too close to a waveform peak, which can create a click at the join.
- Using heavy noise reduction, which can make speech sound hollow or underwater.
- Confusing tags with audio, then wondering why the file still appears wrong in another app.
- Choosing the wrong export quality, especially when the file will be used for music rather than speech.
If you avoid those errors, the process becomes much more predictable. The edit itself is rarely the hard part, the hard part is keeping the result clean, usable, and easy to revisit.
The Mac workflow I would use for most MP3 edits
For a normal job, I keep the process simple. First, I duplicate the original file and store it somewhere safe. Next, I open the copy in GarageBand if the edit is light, or Audacity if I need finer control. Then I make the smallest possible waveform changes, listen around every cut, and export only after I am happy with the result. Finally, I open the file in Music and fix the metadata so the track displays correctly everywhere.
- Keep the original file untouched.
- Edit the copy, not the master.
- Use waveform tools for audio and Music for tags.
- Export once at a sensible bitrate.
- Save a WAV or AIFF master if you expect future revisions.
That workflow is the cleanest way I know to edit MP3 files on Mac without turning a simple task into a quality problem. If the audio will be reused later, keep an uncompressed master alongside the MP3 and treat the MP3 as the delivery copy, not the source of truth.